SHAREthem – Android library to simulate How SHAREit works

ic_launcherSHAREthem library makes File Sharing & Transfer a lot easier!!

Peer-to-Peer transfers are the best way to go when it comes to file sharing.

SHAREit App takes full advantage of it. I’ve seen many questions on StackOverFlow asking about how SHAREit works. (Just search shareit on SO and you’ll see a pageful of questions asking about the same thing). Well,  it’s easy to assume that they use Android Wi-Fi P2P libraries because android developer site says those libraries are used for P2P.

But, if you observe SHAREit app creates a Hotspot on receiver side which defeats the whole purpose of using Android P2P libraries and more over SHAREit works all the way from Android 2.2(at least it used to) where as Android P2P libraries works only on and above Android 4.0. May be they are using combination of both to take leverage of platform apis. But I’m gonna talk about Hotspot way since SHAREthem library is built around it.

UPDATE: Added Android-8, OREO support with default Android Hotspot functionality which comes with password protected Hotspot and so Receiver has to explicitly key-in password, inline with SHAREit functionality.

That’s enough, tell me how it works 🙄

google-play-badge
Also app is posted on Playstore (Still in Beta). Click on the badge to see it action.

SHAREthem library facilitates file sharing and transfers using below components. Library also supports app to web sharing if receiver has no app installed :

  • Hotspot Controller
    HC uses Java Reflection since there are NO APIs available on Android for enabling/disabling Hotspots. Functionalities include:

    • Controller creates an OPEN Wifi hotspot configuration with an SSID which can intercepted by Receivers to recognize SHAREthem senders including port and sender names.
    • Restores user Hotspot-Configuration when Share mode is disabled
    • Provides a list of connected WiFi clients.
  • SHAREthem Server

A tiny HTTP server extended from NanoHttpd, serves the sender data to receivers using IP address as hostname and works on port assigned by user or system by default.

  • SHAREthem Service

Android service which manages lifecycle of SHAREthem-server and also handles foreground notification with stop action.

  • UI (Activities)
    Android activities to handle share/receive actions

    • Receiver – provides UI to list the files available to download. Posts a download request to Android Download Manager to start file downloads.
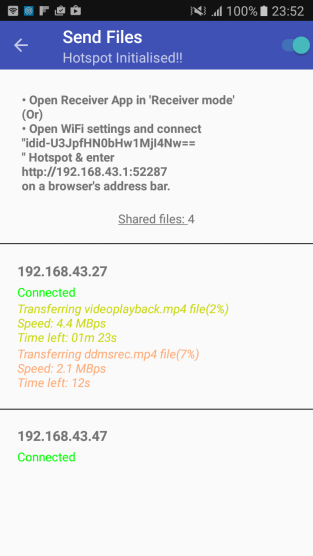
    • Sender – displays IP, Port & connected clients info along with file transfer status for each connected client(Receiver).

How to use it? Talk some code!!

I’ve made a DEMO App using SHAREthem library to demonstrate Sender & Receiver Modes. Demo Activity uses a nice library called android-filepicker for selecting files on Device.

Github link is included at the end of this article. Feel free to checkout.

Sender Mode:

To start Sender mode, you need to pass an array of strings holding references of files you want to share along with port(optional) and sender name using an Intent to start SHAREthemActivity

Intent intent = new Intent(getApplicationContext(), ShareActivity.class);
intent.putExtra(ShareService.EXTRA_FILE_PATHS, files);
intent.putExtra(ShareService.EXTRA_PORT, 52287);
intent.putExtra(ShareService.EXTRA_SENDER_NAME, "Sri");
startActivity(intent);

ShareService.EXTRA_FILE_PATHS: holds location references to local files on device.
In Sample app of Demo project on github i’ve used a nice looking File Explorer library to select files on device memory to share.
ShareService.EXTRA_PORT (optional): incase if you want to start SHAREserver on a specific port. Passing 0 or skipping this lets system to assign its own. One of the downside of letting system to do this is SSID may be not the same for a subsequent Sharing session. (PORT number is used in algorithm to generate SSID)
ShareService.EXTRA_SENDER_NAME (optional): used by Receiver to display connection information.

ShareActivity invokes SHAREService which in turn starts an instance of SHAREServer with device IP as wildcard address and port if unspecified assigned by system. On successful server setup, Hotspot Controller creates an OPEN WIfi Configuration with an SSID using combination of Android ID, Port number and Sender Name.

Activity scans for connected clients constantly using HotspotControl’s methods and adds them list as shown in below screenshots:

Receiver Mode:

Starting receiver mode is pretty simple as no intent extras needed. Receiver Activity starts scanning for senders automatically, you can turn off Receiver mode anytime though.

startActivity(new Intent(getApplicationContext(), ReceiverActivity.class));

Receiver scans for SHAREthem wifi based on naming convention used and fetches files information from SHAREthem server after successful connection. Here is the glance of Server method of server:

@Override
public Response serve(IHTTPSession session) {
    Response res = null;
    try {
        String url = session.getUri();
        Log.d(TAG, "request uri: " + url);
        if (TextUtils.isEmpty(url) || url.equals("/") || url.contains("/open"))
            res = createHtmlResponse();
        else if (url.equals("/status"))
            res = new NanoHTTPD.Response(Response.Status.OK, NanoHTTPD.MIME_PLAINTEXT, "Available");
        else if (url.equals("/apk"))
            res = createApkResponse(session.getHeaders().get("http-client-ip"));
        else if (url.equals("/logo") || url.equals("/favicon.ico"))
            res = createLogoResponse();
        else if (url.equals("/files"))
            res = createFilePathsResponse();
        else if (url.contains("/file/")) {
            int index = Integer.parseInt(url.replace("/file/", ""));
            if (index != -1)
                res = createFileResponse(m_filesTobeHosted[index], session.getHeaders().get("http-client-ip"));
        }
    } catch (Exception ioe) {
        ioe.printStackTrace();
        res = createErrorResponse(Response.Status.FORBIDDEN, ioe.getMessage());
    } finally {
        if (null == res)
            res = createForbiddenResponse();
    }
    res.addHeader("Accept-Ranges", "bytes");
    res.addHeader("Access-Control-Allow-Origin", "*");
    res.addHeader("Access-Control-Allow-Methods", "POST, GET, OPTIONS");
    return res;
}

Receiver activity embeds FilesListingFragment which is responsible for listing of Sender files and enqueue download request to Android Download Manager

Does it work on WEB browsers too?

Yes indeed. SHAREthem server serves an HTML file response which fires download requests upon selecting links. So all you need to do is key in

http://[ip]:[port]

on a web browser after connecting to hotspot. screen-shot-2017-01-09-at-11-42-31-pm

Nice. Any catches?

Yes, few

  • increasing targetSdkVersion version might impact behaviour of this library
    if targetSdkVersion >= 23
  • ShareActivity has to check for System Write permissions to proceed
  • Get Wifi Scan results method needs GPS to be ON and COARSE location permission.
  • library checks the targetSdkVersion to take care of above scenarios if targetSdkVersion > 20
  • If an application’s targetSdkVersion is LOLLIPOP or newer, network communication may not use Wi-Fi even if Wi-Fi is connected.
    this might impact when Receiver connectivity to SHAREthem hotspot, library checks for this scenario and prompts user to disable data
    For more info: https://developer.android.com/reference/android/net/wifi/WifiManager.html#enableNetwork(int, boolean)

Known issues??

  • On some devices with API level 21 and above, “`connectToOpenHotspot()“` method on WifiUtils disables other Wifi networks in-order to connect to SHAREthem WIfi Hotspot. Ideally increasing priority should be enough for making WifiConfiguration but recent Android version are making it hard for Wifi n.ws with no internet connectivity.
  • Enabling SHARE mode when System Wifi Hotspot is already active (enabled by user via Settings) might not work.

Troubleshooting

  • Receiver Connected but not able to display Sender info: As mentioned above, on API level 21 & above, n/w communication may not use Wifi with no internet access if MOBILE DATA has internet access. Library can prompt to disable MOBILE DATA if this scenario is met, but not yet implemented.
    So turn-off mobile to make Receiver work.
  • ReceiverActivity cannot connect to SHAREthem Wifi: Receiver tries to connect to SHAREthem Wifi in every way possible, but throws an error dialog if it fails. Dialog says to manually select SHAREthem Wifi on WIfi Settings.
    As a last resort, you can always manually connect to Sender Wifi.

Are you gonna give me Source Code??

Sure thing. Just remember that it is licensed under  Apache License Version 2.0 🙂

Github link: https://github.com/Sriharia/share-them

Please leave your feedback in comments. Thanks

Hurdles of Volley integration in Android Applications

Having been done with Google Volley (A networking library) integration in Spuul app recently, want to list all the hurdles I had faced during the process. So what’s nice about volley?

  1. One library for Image loading & Network calls.
  2. Performance, not claiming this one to be the best but works as intended for small Http requests.
  3. Fits nicely into Activity life cycle.

Since there are many blogs out there briefing integration part, I’ll run only through hurdles part. In every Http client library there are some basic things you need like access to request/response headers, injecting params into POST/GET calls etc. Unfortunately Volley wont make these things easy for you especially accessing response headers are not possible with StringRequest/JsonRequest objects. Reason was an intentional trade-off: less functionality for a simpler API But I’ve found some workarounds for each of these issues. Let’s go through them one by one (At the end of the post – I’ve written a consolidated Singleton Networking class using all listed points)

  • Accessing Response Headers:

In order to get hands on headers, we need to extend Request class and override parseNetworkResponse & deliverResponse  methods. Extract headers from NetworkResponse object in parseNetworkResponse and add all/needed headers to response in deliverResponse. Here’s how the CustomStringRequest looks like:

package com.*.android.networking;

import com.android.volley.NetworkResponse;
import com.android.volley.Request;
import com.android.volley.Response;
import com.android.volley.toolbox.HttpHeaderParser;

import java.io.UnsupportedEncodingException;
import java.util.Map;

/**
 * Created by Sri on 18/3/15.
 * A custom request to return {@link java.lang.String} response along with {@code Headers} wrapped in {@link StringResponseWithHeader}(a bean class to hold String response and headers Map) object.
 */
public class CustomStringRequest extends Request<StringResponseWithHeader> {

 private final Response.Listener<StringResponseWithHeader> mListener;
 private Map<String, String> mHeaders;

 /**
 * Creates a new request with the given method.
 *
 * @param method the request {@link Method} to use
 * @param url URL to fetch the string at
 * @param listener Listener to receive the String response with headers
 * @param errorListener Error listener, or null to ignore errors
 */
 public CustomStringRequest(int method, String url, Response.Listener<StringResponseWithHeader> listener,
 Response.ErrorListener errorListener) {
 super(method, url, errorListener);
 mListener = listener;
 }

 @Override
 protected void deliverResponse(StringResponseWithHeader response) {
 mListener.onResponse(response);
 }

 @Override
 protected Response<StringResponseWithHeader> parseNetworkResponse(NetworkResponse response) {
 String parsed;
 mHeaders = response.headers;
 try {
 parsed = new String(response.data, HttpHeaderParser.parseCharset(response.headers));
 } catch (UnsupportedEncodingException e) {
 parsed = new String(response.data);
 }
 StringResponseWithHeader obj = new StringResponseWithHeader();
 obj.setHeaders(mHeaders);
 obj.setResponseData(parsed);
 if (null != getTag() && getTag() instanceof String)
 obj.setRequestTag((String)getTag());
 return Response.success(obj, HttpHeaderParser.parseCacheHeaders(response));
 }
}

So this custom Request gives you a response object which has headers & response data embedded in it. For usage of this class, look in example class at the end of post.

  • Adding headers to Request Object

Adding headers to Request object involves in overriding getHeaders() method.

@Override
public Map<String, String> getHeaders() throws AuthFailureError {
    Map<String, String> headers = super.getHeaders();
    if (headers == null || headers.equals(Collections.emptyMap()))
        headers = new HashMap<String, String>();
    if (null != additionalHeaders && additionalHeaders.size() > 0)
        for (Map.Entry<String, String> entry : additionalHeaders.entrySet())
            headers.put(entry.getKey(), entry.getValue());
    headers.put("Accept", "application/****");
    return headers;
}
  • Adding POST/GET params to Request:

Adding params to POST/PUT calls is easy as you just need to override getParams() method. But it doesnt work for GET method since getParams() callback is only for PUT/POST.

Workaround is to append these params as query string to Url, here is how I did it in my code:

 Uri.Builder builder = Uri.parse(mRequestUrl).buildUpon();
 for (Map.Entry<String, String> entry : mRequestParams.entrySet())
 builder.appendQueryParameter(entry.getKey(), entry.getValue());
 url = builder.build().toString();
  • Request Timeouts, Retry Configurations

Volley makes it easy to configure timeouts & retry using setRetryPolicy method.

request.setRetryPolicy(new DefaultRetryPolicy(<strong>timeOut</strong>,
 DefaultRetryPolicy.DEFAULT_MAX_RETRIES,
 DefaultRetryPolicy.DEFAULT_BACKOFF_MULT));

Consolidating all the above points, here is a Singleton class which provides RequestQueue instance:


package com.*.android.networking;

import android.content.Context;
import android.net.Uri;

import com.android.volley.AuthFailureError;
import com.android.volley.Cache;
import com.android.volley.DefaultRetryPolicy;
import com.android.volley.Network;
import com.android.volley.Request;
import com.android.volley.RequestQueue;
import com.android.volley.toolbox.BasicNetwork;
import com.android.volley.toolbox.DiskBasedCache;
import com.android.volley.toolbox.HurlStack;

import java.util.Collections;
import java.util.HashMap;
import java.util.Map;
/**
* Created by Sri on 16/3/15.
*/
public class SampleNetworking {
private static SampleNetworking mInstance;
private static Context mCtx;
private RequestQueue mRequestQueue;
final int DEFAULT_TIMEOUT = 30 * 1000;

public Request go(final String url, int methodType, Map<String, String> params, Response.Listener<StringResponseWithHeader> successResponseListener, Response.ErrorListener errorListener, final Map<String, String> additionalHeaders, Object tag, int timeOut) {
    if (methodType == Request.Method.GET || methodType == Request.Method.DELETE) {
        Uri.Builder builder = Uri.parse(url).buildUpon();
        for (Map.Entry<String, String> entry : params.entrySet())
        builder.appendQueryParameter(entry.getKey(), entry.getValue());
        url = builder.build().toString();
    }
    CustomStringRequest request = new CustomStringRequest(methodType, url, successResponseListener, errorListener) {
        @Override
        protected Map<String, String> getParams() throws AuthFailureError {
            return params;
        }

        @Override
        public Map<String, String> getHeaders() throws AuthFailureError {
            Map<String, String> headers = super.getHeaders();
            if (headers == null || headers.equals(Collections.emptyMap())) {
                headers = new HashMap<String, String>();
            }
            if (null != additionalHeaders && additionalHeaders.size() > 0)
            for (Map.Entry<String, String> entry : additionalHeaders.entrySet()) {
                headers.put(entry.getKey(), entry.getValue());
            }
            headers.put("Accept", "application/*");
            return headers;
        }
    };
    request.setRetryPolicy(new DefaultRetryPolicy(timeOut, DefaultRetryPolicy.DEFAULT_MAX_RETRIES, DefaultRetryPolicy.DEFAULT_BACKOFF_MULT));
    if (null != tag)
        request.setTag(tag);
    return mRequestQueue.add(request);
}

public static synchronized SampleNetworking getInstance(Context context) {
    if (mInstance == null) {
        mInstance = new SampleNetworking(context);
    }
    return mInstance;
}
private SampleNetworking(Context ctx) {
    mCtx = ctx;
    getRequestQueue();
}

public RequestQueue getRequestQueue() {
    if (mRequestQueue == null) {
        // Instantiate the cache
        Cache cache = new DiskBasedCache(mCtx.getCacheDir(), 1024 * 1024); // 1MB cap
        // Set up the network to use HttpURLConnection as the HTTP client.
        Network network = new BasicNetwork(new HurlStack());
        // Instantiate the RequestQueue with the cache and network.
        mRequestQueue = new RequestQueue(cache, network);
        // Start the queue
        mRequestQueue.start();
    }
    return mRequestQueue;
}
}

Hope this helps for Volley newbies. let me know if you face any other issues.

Thanks

Android app to browse/serve media across DLNA devices

After spending couple of weekends on creating demo app, finally I am able to publish this post on DLNA/Upnp media management.

First of all – What is DLNA?

DLNA is a standard to facilitate access to multimedia content between devices connected within the same computer network. For more information about DLNA, see http://en.wikipedia.org/wiki/Digital_Living_Network_Alliance.

This blog post shows how to create an Android app which can –

  • Browse contents of any DLNA media server and renders their content  locally on Android device.
  • Controls playback on other Media Renderers on same network.
  • Also I have added a functionality to server local device media files to a selected Renderer device thorough hosting a NanoHttpD server in application. (Yes, not a standard DMS device, but works to serve files to other devices)

I have used CyberLinkForJava library which controls DLNA protocols automatically and supports to create your devices and control points quickly. For more info on how this library works, here is a quick programming guide for CyberLink Java.

Let’s run through the details of the demo app – Source & demo APK links are available at the end of blog post 🙂

Backbone of this app is DLNA service which starts a HandlerThread to handle lifecycle of a ControlPoint which notifies when a device is added/removed along with search response callbacks. This Service gets started in Launcher activity and runs indefinitely until we stop it.

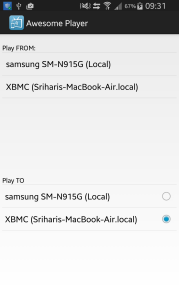
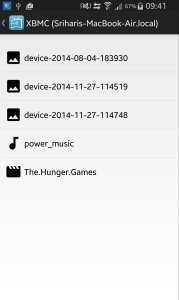
Launcher activity hosts two listviews – PlayFrom & PlayTo. I have appended local device entry to both lists explicitly (not through search callbacks from service). You can browse through ‘PlayFrom‘ devices to pick media content to play on selected Renderer(default is local device).

device-2015-03-07-093227      device-2015-03-07-094149

BrowseDMSManager class takes care of enquiring content directories using service name: ‘urn:schemas-upnp-org:service:ContentDirectory:1

If you select local device to browse, I’ve used FilePickerLibrary to pick files locally and start a HttpServer to serve those files to selected Renderer device. Read my earlier blog post on how to serve local files using HttpServer, though I’ve used NanoHttpD here to handler all possible scenarios.

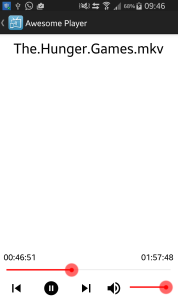
RemoteDlnaController class is responsible for managing communications b/w client and server devices. It has utilities to send PLAY, PAUSE, STOP, VOLUME controls etc.. actions to Renderer device. device-2015-03-07-094701  Screen Shot 2015-03-07 at 9.45.11 am

I’ve added zoom functionality to Image Pageview and some Jazziness, thanks to TouchView, JazzyViewPager & Universal ImageLoader.

Posted demo source to my GitHub. APK is available here.

let me know what you think of it 🙂

ExoPlayer Hacks: Part 2 – Improved Buffering

This is 2nd post in ExoPlayer Hacks series, if you are wondering what was there in Part1, you can catch it up here.

What about Buffering?

OK there is nothing wrong with way Buffering is handled in Exo, but when I went through DefaultLoadControl component it seems that buffering policy is constrained. I will explain how part in detail later. When asked why, one of the Exo developers responded as below

“There are arguments that mobile carriers prefer this kind of traffic pattern over their networks (i.e. bursts rather than drip-feeding). Which is an important consideration given ExoPlayer is used by some very popular services. It may also be more battery efficient.”

though default policy seem to work in general, it might not be sufficient for all scenarios.

In my case I have to increase the buffer to 2-3 minutes on our TV platform with only 2 renditions available which means rendition switch wont happen too often.

First, let’s understand current Buffer policy

Default Buffer Policy

/**
 * The default minimum duration of media that the player will attempt to ensure is buffered at all
 * times, in milliseconds.
 */
public static final int DEFAULT_MIN_BUFFER_MS = 15000;
/**
 * The default maximum duration of media that the player will attempt to buffer, in milliseconds.
 */
public static final int DEFAULT_MAX_BUFFER_MS = 30000;
/**
 * The default duration of media that must be buffered for playback to start or resume following a
 * user action such as a seek, in milliseconds.
 */
public static final int DEFAULT_BUFFER_FOR_PLAYBACK_MS = 2500;
/**
 * The default duration of media that must be buffered for playback to resume after a rebuffer,
 * in milliseconds. A rebuffer is defined to be caused by buffer depletion rather than a user
 * action.
 */
public static final int DEFAULT_BUFFER_FOR_PLAYBACK_AFTER_REBUFFER_MS  = 5000;

Out of above 4 constants, 2 of them control the load timing and the other two control when the playback starts by having sufficient buffering. Please refer to the figure below.

The maxBufferUs & minBufferUs are about the load timing but bufferForPlaybackAfterRebufferUs & bufferForPlaybackUs are about when the playback starts by having sufficient buffering.

b8cfffe2-f02f-11e6-8781-3e3ba43aa81d

Refer to shouldContinueLoading(), a typical loading pattern includes 3 stages.

@Override
public boolean shouldContinueLoading(long bufferedDurationUs) {
  int bufferTimeState = getBufferTimeState(bufferedDurationUs);
  boolean targetBufferSizeReached = allocator.getTotalBytesAllocated() >= targetBufferSize;
  boolean wasBuffering = isBuffering;
  isBuffering = bufferTimeState == BELOW_LOW_WATERMARK
      || (bufferTimeState == BETWEEN_WATERMARKS && isBuffering && !targetBufferSizeReached);
  if (priorityTaskManager != null && isBuffering != wasBuffering) {
    if (isBuffering) {
      priorityTaskManager.add(C.PRIORITY_PLAYBACK);
    } else {
      priorityTaskManager.remove(C.PRIORITY_PLAYBACK);
    }
  }
  return isBuffering;
}

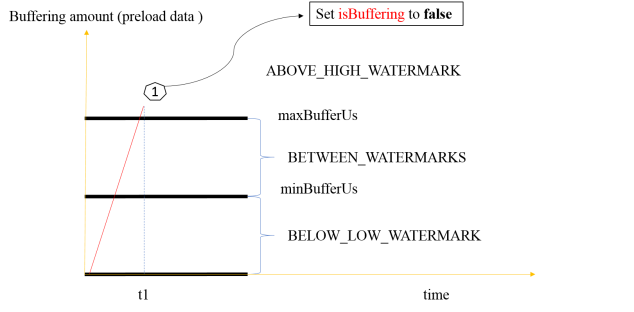
At the first stage we continuing loading until maxBufferUs is reached as below.

812da840-f030-11e6-9aee-f0f224144a37

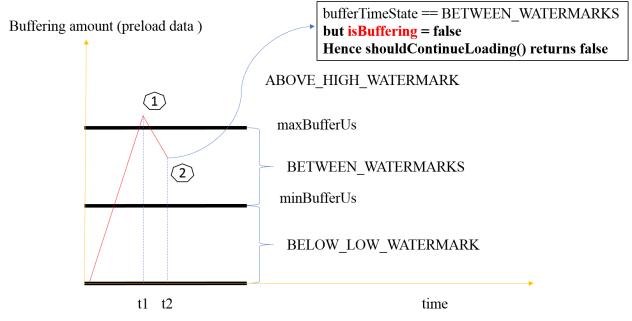
Since then isBuffering = false and bufferTimeState == BETWEEN_WATERMARKS; so shouldContinueLoading() returns false as below.

d758d3a2-f030-11e6-9b14-ff4f6c7857df

Finally, when bufferTimeState == BELOW_LOW_WATERMARK again we recover the download, as the figure below.

ffc588ee-f030-11e6-9bd9-fffb11aa52b3

As per the flow described, you could see within the period of [t1, t3] actually we DO NOT load anymore. Therefore you may meet the condition, for example to have merely ~ 15 seconds buffering.

Besides, there is a limit upon buffering size. In short, typically the buffering data will be from 15 to 30 second if your connection speed is good enough.

How to enlarge the buffer?

Remove the upper limit by applying ‘Drip – Feeding’ method.

isBuffering = bufferTimeState == BELOW_LOW_WATERMARK
    || (bufferTimeState == BETWEEN_WATERMARKS
        /*
         * commented below line to achieve drip-feeding method for better caching. once you are below maxBufferUs, do fetch immediately.
         * Added by Sri
         */
        /* && isBuffering */
        && !targetBufferSizeReached);

Also enlarge maxBufferUs & minBufferUs

/**
 * To increase buffer time and size.
 */
public static int VIDEO_BUFFER_SCALE_UP_FACTOR = 4;
....
minBufferUs = VIDEO_BUFFER_SCALE_UP_FACTOR * minBufferMs * 1000L;
maxBufferUs = VIDEO_BUFFER_SCALE_UP_FACTOR * maxBufferMs * 1000L;
...

checkout the CustomLoadControl for code reference.

You can add below log in shouldContinueLoading() to verify the improvement before and after.

Log.e("CustomLoadControl","current buff Dur: "+bufferedDurationUs+",max buff:" + maxBufferUs +" shouldContinueLoading: "+isBuffering);

Cool. yeah!!

Hope you enjoyed both of these articles. If you are ExoPlayer lover, do try these hacks (github demo) and leave me your feedback.

ExoPlayer Hacks: Part 1 – Stats For Nerds

Google’s ExoPlayer is best in class media player for Android and it supports many features which are not currently supported by stock MediaPlayer.

Best part about Exo is it’s  OpenSource-ness 🙂

In this series of blog posts I’m gonna walk through a couple of useful hacks/customisations on some of Exo components:

  • Stats For Nerds – Part 1
  • Improved Buffering – Part 2

Find the demo on github which covers both features.

Stats for Nerds:

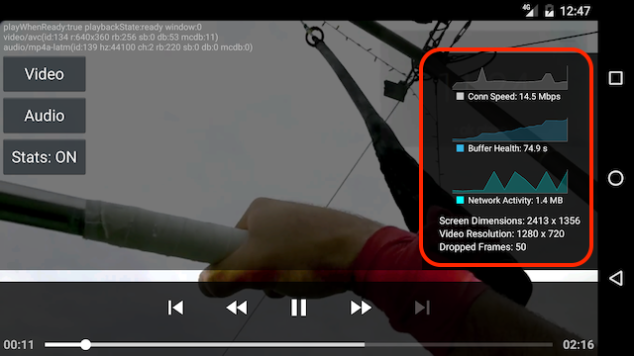
charts

With Adaptive streaming techniques(HLS, Smooth, DASH), playback is heavily relied on connection speed, meaning resolution changes to adapt to fluctuations in bandwidth which means data consumption varies with time.

As a geek I’ve wondered what’s my n/w consumption, conn speed & sometimes buffer length when I stream a video online. Youtube on Chrome answered these concerns with ‘Stats For Nerd’ mode which depicts all those stats using simple dynamic charts and I found it intriguing. So I decided to do something similar on ExoPlayer and turned out it’s easier than I thought.

Which Stats?

  • Connection Speed:
  • Network Activity
  • Buffer Health
  • Dropped Frames
  • Video & Screen Resolutions

Code Please

  • Connection speed & n/w activity can be obtained by passing BandwidthMeter.EventListener while creating DefaultBandwidthMeter object.
bandwidthMeter = new DefaultBandwidthMeter(mUiUpdateHandler, new BandwidthMeter.EventListener() {
    @Override
    public void onBandwidthSample(int elapsedMs, long bytes, long bitrate) {
        bitrateEstimate = bitrate;
        bytesDownloaded = bytes;
    }
});
  • ExoPlayer exposes all available Tracks and their corresponding Formats and setting a Video debug listener will give update you whenever input video format changes. Format is a container of all meta data related to a Video Rendition (width, height, bitrate etc.)
  • Dropped frames can be obtained by Video debug listener too.
player.setVideoDebugListener(new VideoRendererEventListener() {
  
    ....
    @Override
    public void onVideoInputFormatChanged(Format format) {
        currentVideoFormat = format;
    }

    @Override
    public void onDroppedFrames(int count, long elapsedMs) {
        droppedFrames += count;
    }
    ......
}

 Buffer health & LoadControl

LoadControl is an Exo Component interface to control buffering of Media and there is a DefaultLoadControl in SDK which takes of when to start buffering and for how long.

We can create our version of DefaultLoadControl with an event listener & a handler to notify player on a buffer data. Check CustomLoadControl class for more info.

player = ExoPlayerFactory.newSimpleInstance(renderersFactory, trackSelector, new CustomLoadControl(new CustomLoadControl.EventListener() {
    @Override
    public void onBufferedDurationSample(long bufferedDurationUs) {
        bufferedDurationMs = bufferedDurationUs;
    }
}, mUiUpdateHandler));
player.addListener(this);

OK. How to draw those awesome charts?

MPAndroidChart is a second to none charting library in Android and it covers all our charting requirements with no exceptions.

Create a Handler to repetitively call to itself every 500ms to update speed & buffer data and N/W activity has to be updated atleast with 1100ms so that updates wont overlap.

private void startPlayerStats() {
    mUiUpdateHandler.removeMessages(MSG_UPDATE_STATS);
    mUiUpdateHandler.removeMessages(MSG_UPDATE_STATS_NW_ONLY);
    depictPlayerStats();
    depictPlayerNWStats();
}

protected void depictPlayerStats() {
    if (!canShowStats())
        return;
    String buffer = DemoUtil.getFormattedDouble((bufferedDurationMs / Math.pow(10, 6)), 1);
    String brEstimate = DemoUtil.getFormattedDouble((bitrateEstimate / Math.pow(10, 3)), 1);
    updateStatChart(player_stats_health_chart, Float.parseFloat(buffer), ColorTemplate.getHoloBlue(), "Buffer Health: " + buffer + " s");
    updateStatChart(player_stats_speed_chart, Float.parseFloat(brEstimate), Color.LTGRAY, "Conn Speed: " + DemoUtil.humanReadableByteCount(
            bitrateEstimate, true, true) + "ps");
    player_stats_size.setText("Screen Dimensions: " + simpleExoPlayerView.getWidth() + " x " + simpleExoPlayerView.getHeight());
    player_stats_res.setText("Video Resolution: " + (null != currentVideoFormat ? (currentVideoFormat.width + " x " + currentVideoFormat.height) : "NA"));
    player_stats_dropframes.setText("Dropped Frames: " + droppedFrames);
    mUiUpdateHandler.sendEmptyMessageDelayed(MSG_UPDATE_STATS, 500);
}

protected void depictPlayerNWStats() {
    if (!canShowStats())
        return;
    updateStatChart(player_stats_nw_chart, (float) (bytesDownloaded / Math.pow(10, 3)), Color.CYAN, "Network Activity: " + DemoUtil.humanReadableByteCount(
            bytesDownloaded, true));
    bytesDownloaded = 0;
    mUiUpdateHandler.sendEmptyMessageDelayed(MSG_UPDATE_STATS_NW_ONLY, 1100);
}


Follow my next blog in series for Part 2 – Improved Buffering.

Multistate ImageView in Android

As per Android design guidelines every interactive element in layout has to have a touch feedback and so do image views.

Since my app has complicated UI with multiple imageviews, I’ve dealt this with a custom imageview overriding onTouchEvent method to intercept touch events.

Trick is to apply ColorFilter on ACTION_DOWN and clear it on ACTION_UP or ACTION_CANCEL events. (make sure you return true in onTouchEvent or actions may get delegated to click action and ACTION_UP may never get called)

To handle onclick listener actions, calculate touch event duration and distance from initial touch coordinates on ACTIONUP event and invoke performClick() accordingly.

Here is the code snippet for reference:

 private static final int MAX_CLICK_DISTANCE = 15;  
      private long pressStartTime;  
      private float pressedX;  
      private float pressedY;  
      private static final int MAX_CLICK_DURATION = 500;  
      @Override  
      public boolean onTouchEvent(MotionEvent event) {  
           if (null == getDrawable())  
                return super.onTouchEvent(event);  
           switch (event.getAction()) {  
           case MotionEvent.ACTION_DOWN: {  
                pressStartTime = System.currentTimeMillis();  
                pressedX = event.getX();  
                pressedY = event.getY();  
                // overlay is white with transparency of 0x40 (25)  
                getDrawable().setColorFilter(0x40ffffff, PorterDuff.Mode.SRC_ATOP);  
                invalidate();  
                break;  
           }  
           case MotionEvent.ACTION_UP:  
                long pressDuration = System.currentTimeMillis() - pressStartTime;  
                if (pressDuration < MAX_CLICK_DURATION  
                          && distance(pressedX, pressedY, event.getX(), event.getY()) < MAX_CLICK_DISTANCE) {  
                     performClick();  
                }  
           case MotionEvent.ACTION_CANCEL: {  
                // clear the overlay  
                getDrawable().clearColorFilter();  
                invalidate();  
                break;  
           }  
           }  
           return true;  
      }  
      private static float distance(float x1, float y1, float x2, float y2) {  
           float dx = x1 - x2;  
           float dy = y1 - y2;  
           float distanceInPx = (float) Math.sqrt(dx * dx + dy * dy);  
           return pxToDp(distanceInPx);  
      }  
      private static float density;  
      private static float pxToDp(float px) {  
           return px / density;  
      }  

Above code looks for minimum touch duration of 500ms and maximum movement of 15dp to perform click actions.

Visual feedback looks like:

combine_images1

Here is the demo project on github with custom imageview to support pressed state changes.

Hope this helps.

HttpServer on Android to stream local video files to other devices

This blogs explains how to embed a mini HttpServer into your android app to serve local video files from your device to  other devices/desktop browsers/mediaplayers

You can do it by serving the local file using Java ServerSocket : server-side socket that waits for incoming client connections. A ServerSocket handles the requests and sends back an appropriate reply.

I made a demo App explaining this functionality, check out the code from Github (demo has a sample mp4, you can find it in assets folder. Move it your SD card  root folder to run the demo successfully)

device-2014-09-06-210137

LocalFileStreamingServer is a Thread which implements Runnable interface, you can create server object by passing the video file object from your activity. Continue reading

Subtitles support to Android MediaPlayer across any OS version

One of the key features in video hosting applications is Subtitles availability.

Unfortunately on Android, default media player doesn’t support SRT subtitles until Jellybean. Even on JB, it doesn’t give much flexibility to play around those APIs. I have had my troubles in debugging some intermittent crashes with no help from stack traces.
More over Android TV runs on Honeycomb devices which leaves us no other option than having our own functionality.

I came across a blog which mentioned about a hidden gem Subtitle Converter, a JAVA research project which deals with conversion of subtitle format to one another. Continue reading

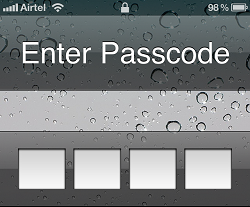
IOS style password control on Android

A while ago I came across a kind of weird requirement by an IOS biased client :P, he wanted to have a control which looks like an IOS lock screen password field.

                                     VS246

Since there is no control available in Android of this kind, I decided to create a compound component using a hidden EditText underneath other layouts. Continue reading